On a Sunday i have decided to help out with some weaving guidance. I hope to post most Sundays.
I best start off right at the beginning.
When deciding to learn to weave it is hard to decide what loom to weave on. I am writing a blog today to help look at the
main types of loom and the experience of some looms i have tried.
Ridge Heddle Loom
This is a frame loom that only has one reed come shaft, were you thread the warp alternately. You can only create Plain Weave Structures. Heddles need to be manipulated separately.
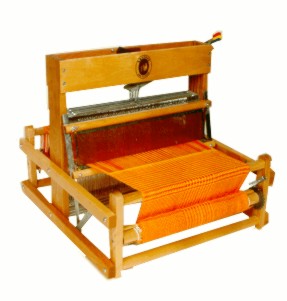
Table Loom - (I have used one)
Table looms are great if you only have a small space to weave in as they can be placed on a table top or work bench. These looms are great to transport also if you wish to demonstrate your skills. I sometimes take mine to craft fair with me for added impact.
You can get table looms with many shafts, most have 4 shafts but can also have 8 or 16. The difference between this loom and other is that it is totally hand operated. Leavers let the weaver operates the shafts on the loom, these can be at the side or in front of the loom. This looms have a front and back beam with a ratchet to keep the tension on the cloth. A Table Loom also has a beater that is either overhung, underslung or sliding - mine is Underslung.
Overhung - Attached to the top of the loom
Underslung - moves from the bottom of the loom
Sliding - works like a draw opening and closing
Tapestry Loom
These are
1. a simple frame with nails at top and bottom that hold the warp in place
2. sophisticated frame for multiple warp threads with two rods to alternate warp threads. You can also move your warp and fabric round the Tapestry frame
When weaving on a Tapestry Loom you don't have to work continually across the cloth, you can select areas in the warp were you would like to weave
Floor Loom - (I have used one)
Floor Looms come in a variety of styles
1. Counterbalance - I have used one
2. Countermarch
3. Jack
4. Dobby - I have used one
Counterbalance Floor Loom
These looms normally have 4 shaft but can sometimes have 8. Each shaft is attached to a roller pulley system. These pulleys are attached to 6 treddles at the bottom of the loom. When depress a treddle it move the pulleys and moving the shafts they are tied to. This means you can move more than one shaft at a time with your feet.

Counterbalance Floor Loom
This loom can be used on any number of shafts as each treadle is attached to every shaft. I dont realy have much experience of this type of loom.
Dobby Floor Loom
They usually have 12 or more shafts, and have a dobby box attached to the side of the loom in place of treadles and tie-up. The action is similar to a table loom, and the dobby box, either mechanical or computer-driven, selects the shafts pre-programmed into the system. The mechanical system works on pegs and lags, where lags are small bars with holes in according to the total number of shafts on your loom. Pegs are inserted into the holes of a lag to denote which shafts you want raised for that particular pick. Each lag denotes one passage of a weft.