
A Blog about my love of weaving and general craft and design
Friday, 16 August 2013
Magazine Photoshoot in ECT North East Magazine - Featuring My Accessories
Just found out some of my products - Laura Parkin Hand Woven Designs - have been used in a magazine photo shoot for an article about KOTA Styling & Boutique. Just want to say thank you Krista Puranen Wilson for using them in your images

Wednesday, 5 June 2013
NEW STOCKIST
My work is now stocked in Newcastle's newest Boutique

'KOTA Styling & Boutique'
This store specialises in contemporary design from local designers, like me :) and vintage fashions. They even stock home-wares. Based in Newcastle's Antiques Centre it is a must for everyone who loves design. Please see http://nenaru.wordpress.com for more details.

Thursday, 28 March 2013
Working with florals as colour inspration
I am now working with Florals as inspiration for a colour palette for my warp / final woven cloths. From these I will be making my accessories. These accessories maybe
- Kiss Clasp Coin Purses
- Zipped Make Up Bags with Tassel Detail
- Glasses Cases with Hand Covered Button Detail
- Mini Handbag with Cross Body Chain
- Twisted Fringe Scarves
- Infinity Scarves
- Ipad Covers
- Kindel Covers
- Large Button Style Earrings
- Tiny Button Style Earrings
- Button Style Rings
- Button Style Hairbands
- Button Style Hairgrips
Most accessories will include a 'Laura Parkin' woven label and decorative price tag.

Here is a selection of products based upon the 'Forget Me Not' colour palette.
I plan to have six mini collections based upon floral colours, these will be: 'Forget Me Not', 'Hydrangea', 'Iris', 'Gerbera', 'Freesia' and 'Peony'
Wednesday, 20 February 2013
Weaving Process
I felt a bit creative on the computer today, made a collage of images that briefly show how my fabrics are created.


Sunday, 3 February 2013
Sunday Weaving Guidance: Making a Warp with a Warping Mill
I again sorry for the gap in posts but I am back :).
Today I am talking about warps. I like to think that the warp is like a back bone of the fabric. It is the yarn that is measured out and threaded through the loom. These threads are threaded though the headles, the action of lifting and lowering the headles allows the weaver to create different structures (patterns) in the finished cloth.
Too start weaving everyone knows you must make a warp, people make them in different ways but I personally like to use a warping mill, others like to use a warping board. With a warping milling it is easer to make longer warps with easy and speed.
You must measure out how long and wide you wish your warp to be, i normally go for 14" x 36ft, and make sure you know your epi. Remember when measuring a bundle is half an inch so it is half your epi. Once you have measured your length you carry on turning the warping mill, making a figure of eight at the top and bottom (this is your cross for your cross sticks). Having a cross keeps the order of yarn when you are threading. Once you have warped to your desired sizes, tie off top, bottom, crosses and bundles. Remove from warping mill and chain for storage.
A few top tips
- Take it slow
- Have something or someone to hold onto your cone of yarn so you can have a smooth action
- Double check your bundles
- Always check and tie of your lease (the loop) at the end as it helps you to attach the warp to the apron of the back beam
- Tie of the yarn that holds your bundles and crosses
- Add extra ties around the warp to stop tangles and knots
- Remember to chain your warp to also help with tangles
- And ENJOY you are on your way to weaving cloth.
and you could also look at these youtube videos for ideas
Sunday, 11 November 2012
Sunday Weaving Guidance: How to work out your EPI when weaving
On a Sunday i have decided to help out with some weaving guidance. I hope to post most Sundays.
I best start off right at the beginning. I am going to work through setting up a loom and today i am going to be blogging about

1. Wrap your chosen yarn around an inch on a ruler (see above). Loosely so that the yarn is just touching itsself
I best start off right at the beginning. I am going to work through setting up a loom and today i am going to be blogging about
EPI or ENDS PER INCH
or HOW MANY THREADS PER INCH YOU WILL BE WEAVING
Before you start weaving you must make a warp, BUT before you do this you need to work out your EPI (Ends per inch). Doing this you will get the correct width of cloth you desire and help to get the perfect sett.
1. Wrap your chosen yarn around an inch on a ruler (see above). Loosely so that the yarn is just touching itsself
2. Count how many times the yarn has wrapped around the ruler.
3. This is your EPI your fabric will be sett at
This EPI is a rough guide for what type of sett in the fabric you would like, it can change due to yarn, structure and the desired drape of your cloth .
Normally twills have a higher EPI in comparison to a plain weave structure. If you would like a fabric that has more drape lower the EPI, if you would like a denser fabric heighten the EPI
Sunday Weaving Guidance: What thread to use in a warp
When deciding what yarn to use in your thread you must check its strength.
To do this:
1. take a length (about a foot) of yarn between both hands.
2. Pull on the yarn till it snaps. If it seems to break easily it wont be suitable for a warp as it will start to snap when weaving.

Yarns that are smooth and untextured also work well in a warp. When yarns are textured they tend to snag, knot and snap more than a what a smooth yarn would.
Any yarn can be used in the weft.
To do this:
1. take a length (about a foot) of yarn between both hands.
2. Pull on the yarn till it snaps. If it seems to break easily it wont be suitable for a warp as it will start to snap when weaving.
Yarns that are smooth and untextured also work well in a warp. When yarns are textured they tend to snag, knot and snap more than a what a smooth yarn would.
Any yarn can be used in the weft.
Saturday, 10 November 2012


How Long Does It Take To Weave That?
I often get asked this question and I never had a definitive answer. I have timed myself and here is a rough time scale. I will take you through the steps i take to make cloth.
Making a Warp: 1 Hour 30 Mins

Winding on the Warp: 1 Hour

Threading: 2 Hours

Reeding: 1 Hour

Tying on the Warp: 30 Mins

Total Set Up Time Is 6 HOURS
NOW I COULD START WEAVING
When weaving i can weave 20 inches per hour
Sunday, 4 November 2012
Sunday Weaving Guidance: The Main Different Types Of Looms
On a Sunday i have decided to help out with some weaving guidance. I hope to post most Sundays.
I best start off right at the beginning.
When deciding to learn to weave it is hard to decide what loom to weave on. I am writing a blog today to help look at the main types of loom and the experience of some looms i have tried.
Ridge Heddle Loom
This is a frame loom that only has one reed come shaft, were you thread the warp alternately. You can only create Plain Weave Structures. Heddles need to be manipulated separately.

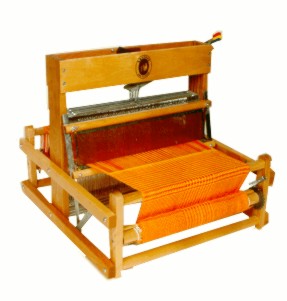
Table Loom - (I have used one)
Table looms are great if you only have a small space to weave in as they can be placed on a table top or work bench. These looms are great to transport also if you wish to demonstrate your skills. I sometimes take mine to craft fair with me for added impact.
You can get table looms with many shafts, most have 4 shafts but can also have 8 or 16. The difference between this loom and other is that it is totally hand operated. Leavers let the weaver operates the shafts on the loom, these can be at the side or in front of the loom. This looms have a front and back beam with a ratchet to keep the tension on the cloth. A Table Loom also has a beater that is either overhung, underslung or sliding - mine is Underslung.
Overhung - Attached to the top of the loom
Underslung - moves from the bottom of the loom
Sliding - works like a draw opening and closing
Tapestry Loom
These are
1. a simple frame with nails at top and bottom that hold the warp in place
2. sophisticated frame for multiple warp threads with two rods to alternate warp threads. You can also move your warp and fabric round the Tapestry frame
When weaving on a Tapestry Loom you don't have to work continually across the cloth, you can select areas in the warp were you would like to weave

Floor Loom - (I have used one)
Floor Looms come in a variety of styles
1. Counterbalance - I have used one
2. Countermarch
3. Jack
4. Dobby - I have used one
Counterbalance Floor Loom
These looms normally have 4 shaft but can sometimes have 8. Each shaft is attached to a roller pulley system. These pulleys are attached to 6 treddles at the bottom of the loom. When depress a treddle it move the pulleys and moving the shafts they are tied to. This means you can move more than one shaft at a time with your feet.

Counterbalance Floor Loom
This loom can be used on any number of shafts as each treadle is attached to every shaft. I dont realy have much experience of this type of loom.

Dobby Floor Loom
They usually have 12 or more shafts, and have a dobby box attached to the side of the loom in place of treadles and tie-up. The action is similar to a table loom, and the dobby box, either mechanical or computer-driven, selects the shafts pre-programmed into the system. The mechanical system works on pegs and lags, where lags are small bars with holes in according to the total number of shafts on your loom. Pegs are inserted into the holes of a lag to denote which shafts you want raised for that particular pick. Each lag denotes one passage of a weft.

Subscribe to:
Posts (Atom)